
 By Thomas Cohen, founder of Maestro
Maestro beta: request access and prepare your first project
How to request an invitation, prepare your AI access and choose a useful first trial. A guide to exploring Maestro on Mac with a clear goal and realistic expectations.
The Maestro beta lets you explore another way to build an application: you describe what you need, a team of AI agents prepares and carries out the work, and you examine the results. To make the most of it, start with a small question to answer. “Can I understand and correct my project's brief?” is already a worthwhile first trial.
Access is by invitation, for macOS 13 or later. Maestro is free during the beta; AI usage depends on your provider and may be billed separately. Invitations are sent in waves. This guide explains what to prepare before access, what to observe while exploring and how to give feedback someone can act on.
We will follow a fictional example: Camille repairs bicycles. She wants to find upcoming repairs and missing parts without searching through several sets of notes. Her workshop, customers and the situations below are invented. They show how to try Maestro without immediately entrusting your business to an application still under construction.
1. Request an invitation and understand what it means
The beta access form is on the home page. Enter an email address you check, your operating system and your preferred email language. Signing up lets you request access and hear when your wave opens. It does not trigger a public download or immediate activation.
No guaranteed invitation deadline has been announced. Use the wait to prepare your trial; there is no need to postpone all thinking until access arrives. Keep the address you used to sign up so you can find the information sent to you. The instructions accompanying your invitation are the reference for installing your version.
A beta is a period when a product continues to evolve with feedback from people using it. You may encounter defects, unclear wording or behaviour that changes between versions. Treat your first project as a limited trial, using a working copy and invented data.
2. Prepare your Mac and a trial workspace
Check the macOS version in your computer's information. If you use Windows, signing up can keep you informed, but it does not make the current beta compatible. Avoid planning a trial that depends on an operating system not yet supported. For a work Mac, also check your organisation's installation rules.
Choose a project whose everyday work and expected results you understand. Camille knows the difference between a bicycle waiting for a part and one ready to return; she can therefore spot a misunderstanding. An unfamiliar subject would require you to learn the business, the method and the tool at the same time.
Prepare three or four fictional examples: a repair to start, one that is blocked and one that is finished. Give them clearly invented names. These examples become your small test dataset, reused after each change. You can compare versions without wondering whether differences come from the data or the work performed.
Also prepare a personal note with your goal, questions and each trial's result. Keep important documents outside your discovery project as well. A separate copy helps you recover your observations if the application has a problem. It does not replace a backup strategy for future professional use.
3. Tell Maestro, the AI assistant and the model apart
Maestro organises the work and approvals. The AI assistant is the service you entrust with tasks. The model is the engine the assistant uses to understand requests and produce responses. These three layers do not necessarily share an account, settings or billing arrangement.
The assistants announced as compatible are Claude Code, Codex, Cursor and Mistral Vibe. To begin, choose access you already understand, or take time to check its conditions. Having an account with a provider does not mean every product and every type of usage is included in your plan.
Find where to check consumption, how to reconnect and which limits apply. Follow the connection guidance in your version of Maestro and the provider's instructions. You do not need to compare every model before your first session. You need to know which service is working and who bills for its use.
Never put a password or access key in your project description, a public screenshot or a feedback message. Use the intended connection process. If you cannot tell whether something is a public identifier or a secret, ask for an explanation before sharing it.
Prepare a simple spending limit
Choose a maximum spend for your exploration and a point when you will check consumption. This personal budget is neither a recommended price nor an estimate for a complete application. It helps you avoid continuing a sequence of trials without noticing what they consume.
Separate the cost of AI access, any additional usage charges and future operating costs for the application. Hosting, a domain or an email service may become relevant later. They are not automatically included because you managed to open a first screen in Maestro.
4. Choose a first success that is small enough
Camille could request the complete management of her workshop: appointments, quotes, stock, invoices, payments and customer messages. She would then have a lot to review without knowing what to check first. To explore the beta, she keeps one question: can she describe and then find the next repair to do?
Her first workflow is to add a fictional repair, assign it a status and find it in a list. The expected result fits in one sentence: “I can see the bicycle to prepare today and distinguish the one waiting for a part.” Payments, notifications and sharing with a colleague remain outside this trial.
This reduction makes feedback easier. If the displayed status is wrong, Camille can point to a specific rule to correct. If she requests her entire business at once, she may only be able to say “that isn't what I wanted”. A small scope makes the discussion more useful and the next change easier to examine.
You can also devote your first session to framing the project, without trying to build immediately. An accurate problem description and a brief you can correct are useful results. Decide at the start what you want to learn; avoid adding another goal every time the AI suggests something.
5. Describe your need and review the proposed brief
Camille could prepare this request: “I repair bicycles in a small workshop. Today, I record jobs and missing parts in several places. I want to find repairs to do and distinguish those waiting for a part. For the first trial, I am the only user and all data is fictional.”
She adds a boundary: “I don't want to manage invoices or notify customers yet. Start by restating the need and the points I have to decide.” This provides direction without imposing a technology. The guide to describing your idea to an AI offers an even shorter version to adapt.
In Maestro, Margaux helps frame the project by turning the idea into a brief. This document describes the problem, the people involved, the expected value and the risks, among other things. Review what it claims about your work. Fluent wording can contain an assumption you have never approved.
For Camille, “every waiting bicycle must be repaired today” would be wrong. Some are waiting for a delivery. Useful feedback would be: “Separate repairs that can proceed from those waiting for a part; don't automatically assign them a deadline.” Then check that the correction appears in the document, rather than settling for agreement in the conversation.
6. Understand what the Tablée demonstration shows
Tablée is the built-in example for discovering how Maestro is organised. Its journey is scripted and its preview is an interactive mockup without saving. It helps you understand the available perspectives on a project; it does not demonstrate that your own application already works.
Use this tour to identify what you will review, where the tasks appear and how a preview looks. Tablée screens in Journal captures show the same example. They do not represent Camille's fictional workshop and are not a customer testimonial.
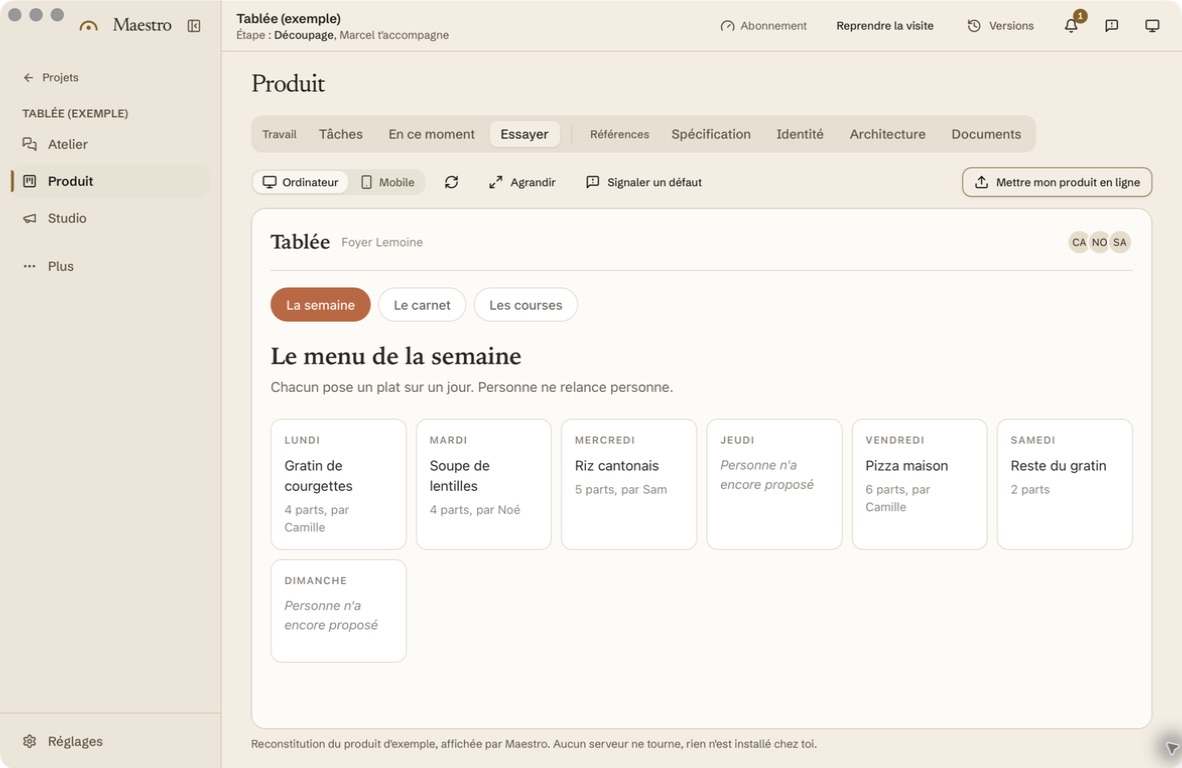
When you move to your project, return to your own checklist. A screen prepared for a tour and an application built from your requirements have different purposes. The Maestro tour lets you discover the general approach before your invitation; the results of your trial must be observed separately.
7. Try a workflow and record what happened
Prepare the scenario before clicking. For Camille: create “Example bicycle A”, assign it “Waiting for a part”, close and reopen the workflow, and find the same status. Record the observed result even when it differs from your expectation. It is working information, not a personal failure.
Then try a small variation: a repair without a description, a status change or a sufficiently long name. Check whether the application explains what is missing and whether the information stays understandable. These trials do not replace a technical review; they check the behaviour you requested.
- Starting point: the fictional data and screen where the trial begins.
- Action: what you do, in order.
- Expected result: what should appear or be retained.
- Observed result: what actually happened.
- Decision: continue, request a correction or pause the trial.
After a correction, repeat the first scenario with the same data. A new result does not prove that the previous one still works. If you cannot verify a part, state that clearly. The guide to the risks of building with AI explains how to extend these checks before real use.
8. Send feedback that helps someone fix the problem
Useful feedback starts with what you were trying to do. “I want to change a repair's status” provides more context than “the button doesn't work”. Add the Maestro version, your macOS version and the assistant used when relevant. Do not invent a technical cause; describe the symptom.
Camille could write: “With three fictional repairs, I open Example bicycle A, choose Finished and return to the list. I expect to see Finished. The list still displays In progress. The same trial produces this result twice.” The recipient then has a starting point for investigating and reproducing the problem.
Attach a screenshot only if it adds information, after hiding private data, accounts and secrets. An exact error message is often more helpful than a lengthy interpretation. Use the channel indicated in your invitation or product version; this guide does not promise a particular response time.
Distinguish a defect from a suggestion. “The status isn't retained” concerns expected behaviour. “I'd like to sort by date” adds a requirement. Presenting them separately avoids confusing a necessary correction with an enhancement to discuss. Also note wording that helped you understand: specific positive feedback is actionable too.
9. Decide what comes after discovery
At the end of your trial, return to the original goal. Did you understand the brief? Can you explain what was built? Could you check the small workflow you chose? If the answer is no, clarify that point before expanding the project. The number of screens produced does not by itself measure the session's usefulness.
Keep a short record: what works, what blocks you, what you do not yet know and your next decision. Camille might choose to refine repair statuses before adding stock management. She might also discover that a shared list is enough. The trial should help you decide, including deciding not to build more.
Before entrusting real data or everyday work to the application, prepare access controls, backups, maintenance and conditions of use. Storing the project on your Mac does not mean the AI runs offline; configured assistants may receive context. The explanation of your data describes this distinction.
To continue, the in-depth guide to creating without coding follows the process through to first real use. To begin exploring, prepare a need, three fictional examples and one thing to verify, then request your invitation. You will have a concrete starting point when your access opens.
Read the complete guide: build an application without coding